
This post has moved to my new site at Planq Studio. Please visit me there to find out how to make this fun project and get inspiration for loads of other projects too!
This post has moved to my new site at Planq Studio. Please visit me there to find out how to make this fun project and get inspiration for loads of other projects too!
Posted by Redesigned By M on March 3, 2014
https://redesignedbym.wordpress.com/2014/03/03/photography-styling-challenge-9-fashion/
This post has moved to my new site at Planq Studio. Please visit me there to find out how to make this fun project and get inspiration for loads of other projects too!
Posted by Redesigned By M on September 30, 2013
https://redesignedbym.wordpress.com/2013/09/30/redesigned-usa-hoodie/

I’ve been coveting a bold striped maxi skirt this season. I even went shopping for one, but it seems the stores are only carrying maxi skirts with diagonal stripes. I was very insistent that the stripes be horizontal. And bold. No wimpy stripes for me!
Then one day just before Fourth of July, while shopping the $1 flip flop sale at Old Navy, I saw several [cheap] tank tops stacked on the tables. The price was so great that I decided I probably needed to refill my dwindling supply of tank tops. But then…. as I fondled the material…. a lightbulb went off in my head.
Maxi skirt!!!!
So, I rummaged for two contrasting colors that would be awesome together. And I bought three tank tops in XL just to make sure I had enough material to work with. The price would be the same whether I got a small or an XXL, so why not get the larger size? It turns out I was spot on in getting the larger size because I needed it to fit around my large a$$.
Here’s how I made the skirt:

And voilà!

I paired the skirt with a navy tank top (also from Old Navy, but in a different style), threw on a long chain necklace and a few baubles with strappy sandals, and I had an instant go-to outfit that was effortless chic! This skirt was so comfortable that I put it on for the mini photo shoot and didn’t take it off for the rest of the day. I love that it’s a T-shirt material – so comfy!

A few other tips I didn’t include in the photo tutorial:

To determine how to lay out the stripes:

What do you think? Do you love it? (Please say you do!)
Total time: 2.5 hours from start to finish. Includes sketching and planning time, which only took about 15 minutes.
Total cost: Each tank top was $3.50 with an additional discount for spending over a certain amount (special promotion for the day). As the discount per item was minimal, I’ll just omit the sales tax from the final total to even things out. The elastic band was recycled from another article of clothing, so that didn’t cost anything. I wish I had navy thread on hand, but I didn’t so I used black thread of which I had mass quantities. Final tally was $10.50!! Woohoo! Quite a good price for getting EXACTLY what I want. Yay!
Related Posts:
Tweed Skirt
Infinity Scarves
Turn Scarves Into Boot Socks

Linking To:
52 Mantels
All Things With Purpose
Chic On A Shoestring Decorating
Common Ground
Crafts-A-La-Mode
Crafty Confessions
Daisy Cottage Designs
DIY Show Off
Elizabeth & Co
French Country Cottage
Homecoming
Homework
I Should Be Mopping The Floor
Knick of Time
Lemon Tree Dwelling
Living Well, Spending Less
Made In A Day
My Uncommon Slice of Suburbia
Nifty Thrifty Things
Redfly Creations
Somewhat Simple
Southern Lovely
The Blackberry Vine
The Dedicated House
The Girl Creative
The Shabby Creek Cottage
The Shabby Nest
The Thriftiness Miss
The Thrifty Groove
The Winthrop Chronicles
Thirty Handmade Days
Twigg Studios
Wife In Progress
Posted by Redesigned By M on July 31, 2013
https://redesignedbym.wordpress.com/2013/07/31/repurposed-diy-striped-maxi-skirt/
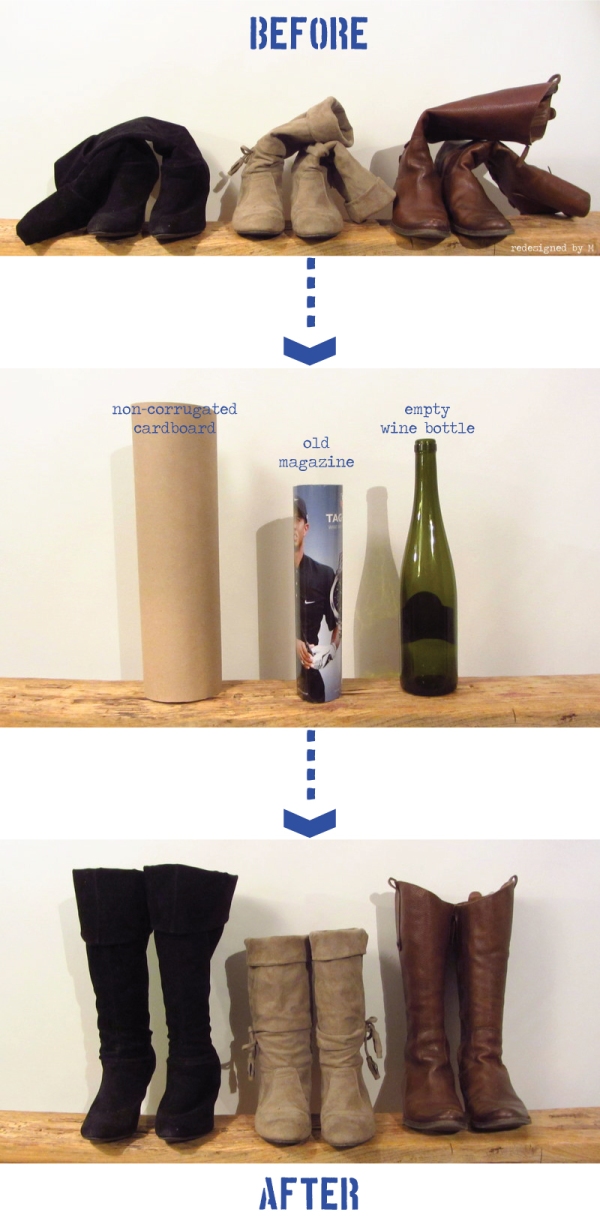
See this photo? Not a fan.
I really, really, REALLY try not to constantly put my two cents into how people organize their closets (I mean, I literally can’t talk to that person anymore lest I blurt it out next time I see them), but it’s oh so difficult to keep my mouth shut sometimes!
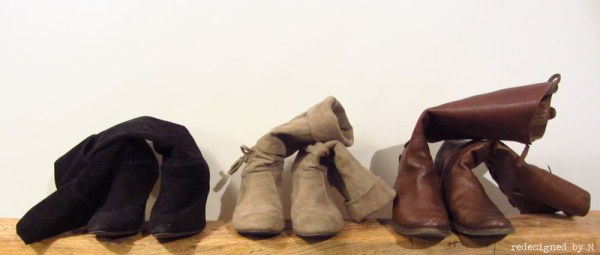
Does anyone realize how easy it is to prevent Floppy Boots Disorder (FBD)?
If I say something, does that make me an annoying busy-body know-it-all? If I say nothing, will this disorder cause contagion? Will FBD ever stop if I say nothing??? This, I ask you!
Firstly, the retail stores actually sell these products call boot shapers. And they’re really pretty awesome. Have a look:
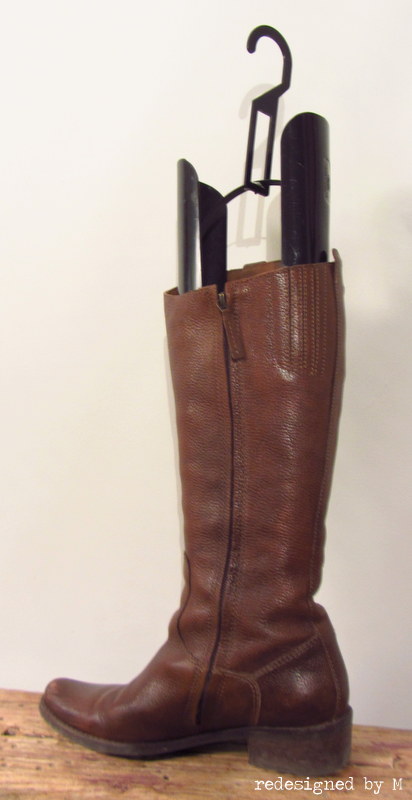
Boot shapers are molded plastic forms that fit inside the leg of your boots to keep them standing upright and formed. They’ll expand to the shape of the leg, so no need to worry if you feel one pair of boots have bigger calves than the next pair of boots. They even have hangers attached to them so you can choose to hang your boots on a rod, off the floor. You know what the downside of these boot shapers are? They’re a bit expensive. Like, $15-$20 per pair expensive. The cost can add up if you have several pairs of boots, like I have.
So why not try a few other alternatives that are easier on your wallet and the environment? Repurpose the following (very effective) items to keep those boots shapely and upright when stored in the closet:
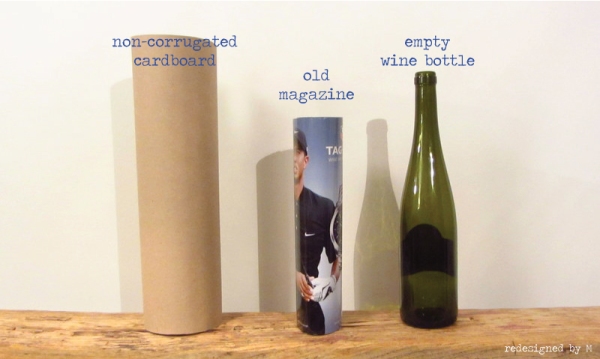
Boom! Mind blown, right? Insert any of these items into your boot(s) and your FBD will be remedied. [Cardboard and magazine will have to be rolled up.]
Here’s a recap (and just because I wanted to make a graphic):
Would it be highly cocky of me to say, “You’re welcome,” at this point? Yes? OK. How about I end this with, “Hope that helps!”
*wink*
Posted by Redesigned By M on June 12, 2013
https://redesignedbym.wordpress.com/2013/06/12/repurposed-prevent-floppy-boot-disorder/

I’ve had this pair of slacks for years, decades maybe. I kept them because they were comfortable, but I never liked the way they looked on me. Maybe back in the early 2000’s, the style was suitable, but now… well, it’s just frumpy. And I looked dumpy in them. Perhaps even lumpy. Haha… I’m such a nerd.
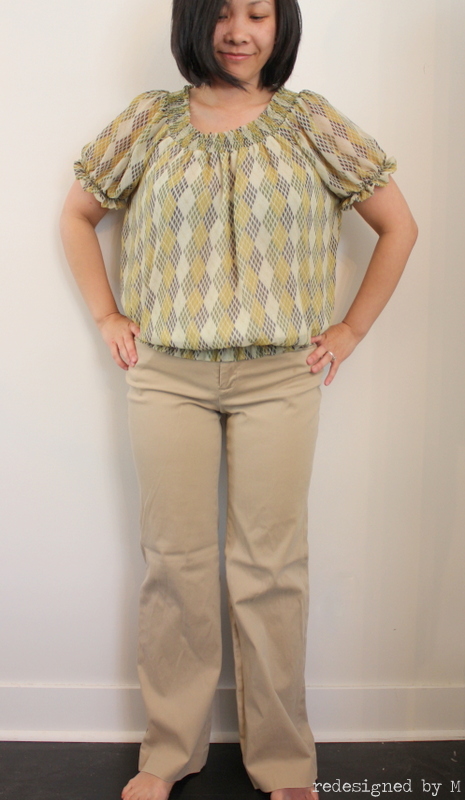
Do not even talk to me about the top! I know that is just as frumpy as the khakis. I’ll be saving that for another refashioned post, when I, er, get around to fixing it up.

Since I am not an expert seamstress, and a lazy one at that, I used a pair of good form fitting jeans as a template. I used this same technique for my refashioned tweed skirt.
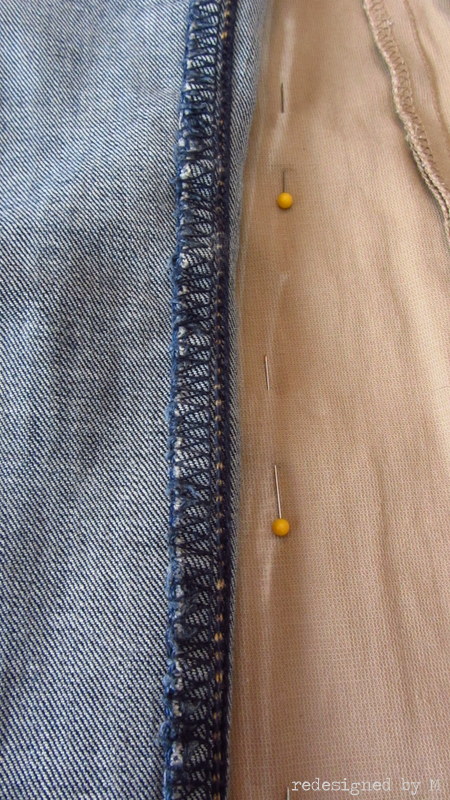
I traced the jeans with chalk and then pinned. (Oh my God! Look at all that extra fabric!)

I started my stitches at the existing seam so that the new fit would be seamless and wouldn’t have to take any stitches out to start over. I tried on the slacks before cutting. I determined I liked the fit, so I removed the pants and cut about a half inch away from the new stitches with pinking shears. Pinking shears are excellent for someone who doesn’t have a serger, like me. And who doesn’t want to do more sewing than necessary, like me.

And here are the new khakis! Pretty awesome, huh? Should I have ironed the slacks before photographing them? Maybe.

Just chillin’ with a fedora and some loafers. Not sure if this look is right for me. So I tried something else…

I took them out in the rain with my spicy pink rain boots.

Unfortunately, there weren’t enough puddles for me to jump in, so I drew in my own.

Frumpy to awesome khakis…. who agrees?
Total time: Only half an hour! (Remember I am inexperienced!)
Total cost: Nothing!
![]()
The Photography Styling Challenge starts next month! Participants are welcome! Find out how to join by clicking this link here.
Posted by Redesigned By M on June 5, 2013
https://redesignedbym.wordpress.com/2013/06/05/redesigned-frumpy-to-awesome-khaki-slacks/

